| View previous topic :: View next topic |
| Author |
Message |
Baxsie
Joined: 12 Apr 2012
Posts: 253
|
 Posted: Mon May 19, 2014 5:49 pm Post subject: CNC throttle cable bracket using desktop manufacturing Posted: Mon May 19, 2014 5:49 pm Post subject: CNC throttle cable bracket using desktop manufacturing |
 |
|
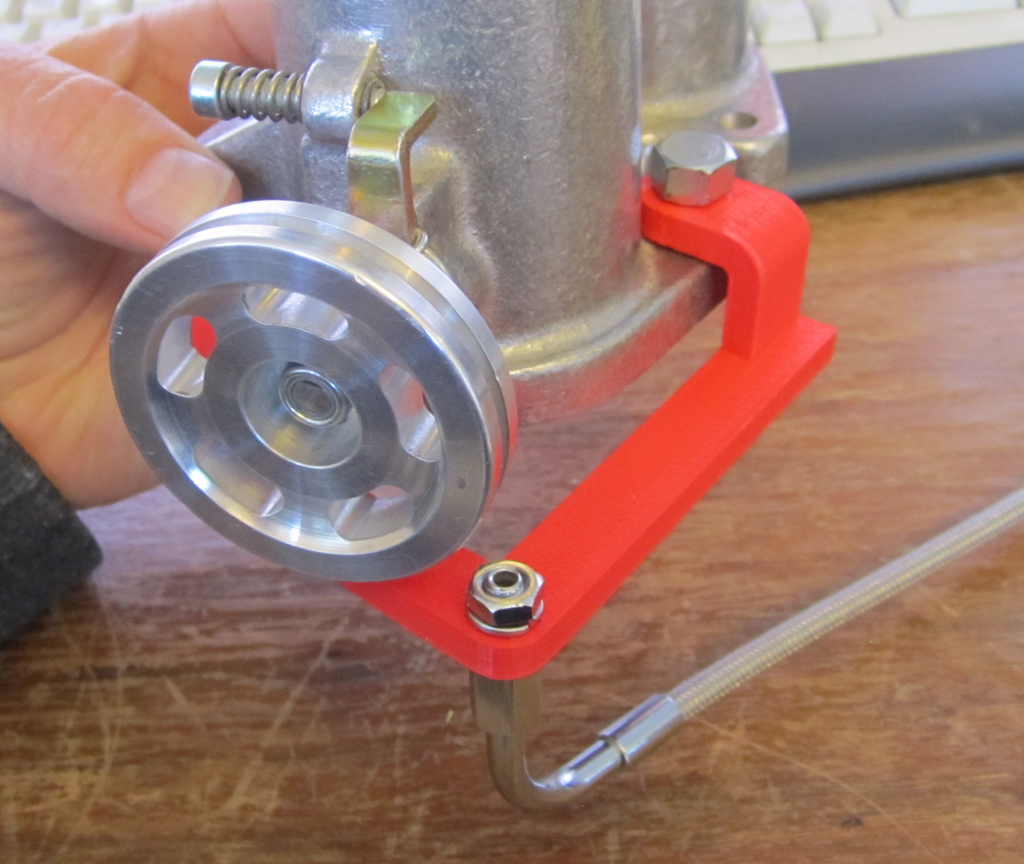
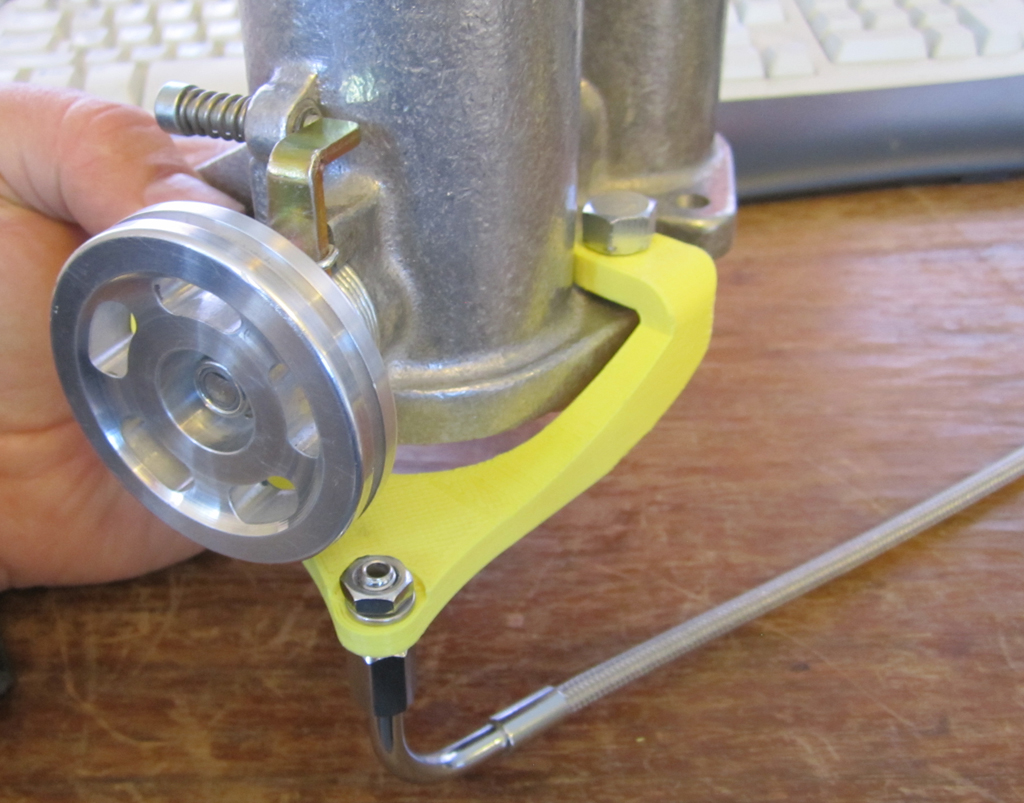
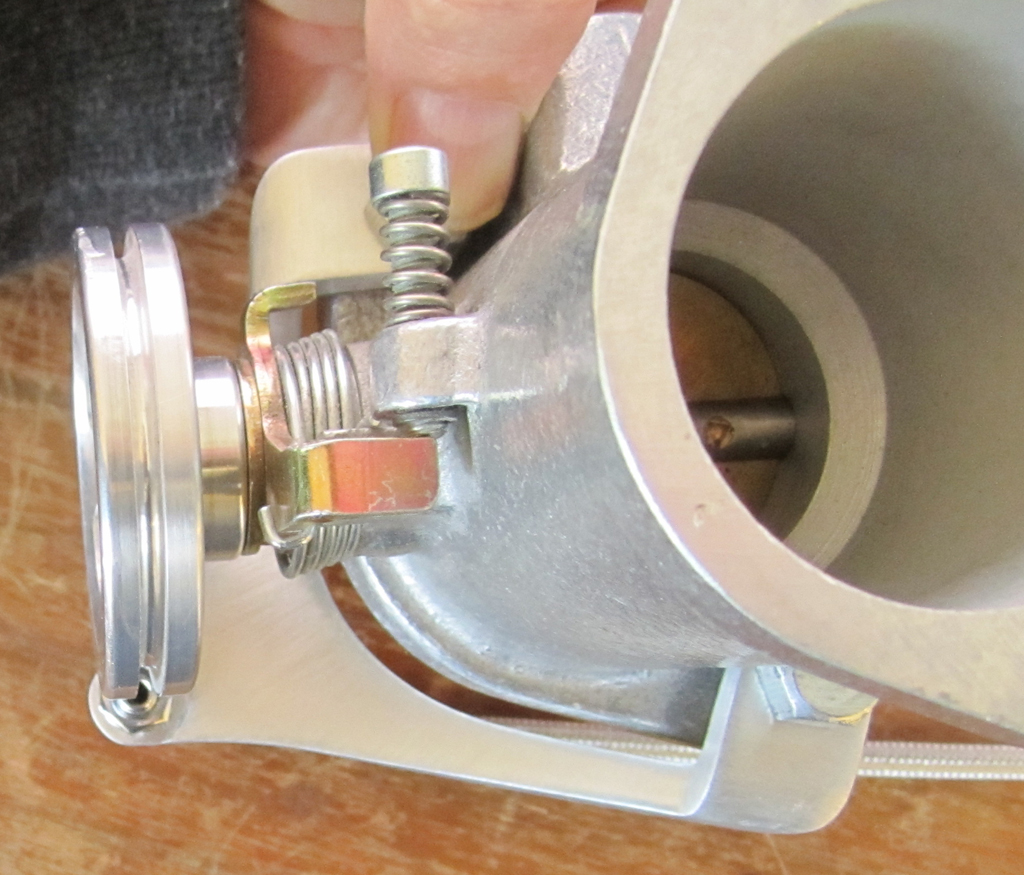
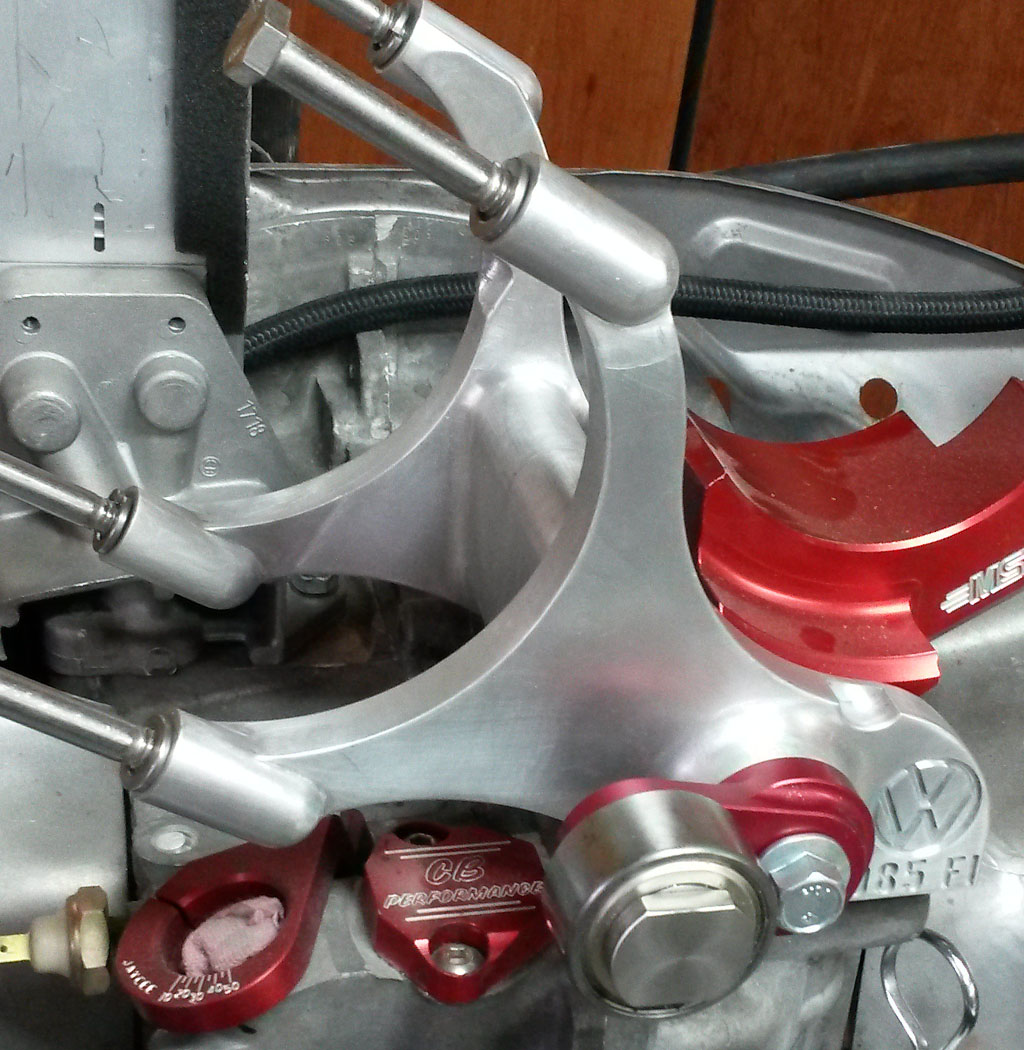
We got some great throttle pulleys from "slowtwitch" of Sync Link fame.
We wanted to run individual cables from each pully to a splitter to keep the engine compartment as clean as possible. We purchased some nice looking braided motorcycle throttle cables from Venhill.
Now we needed a way to hold the cable in the right position to engage with the pulley. We made a quick 3d print of a bracket to check if the concept would work:
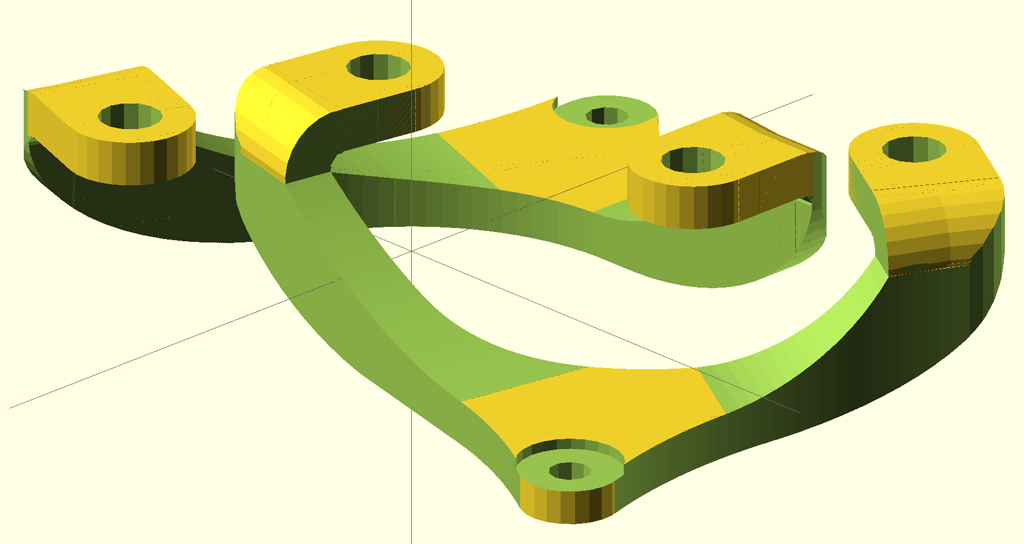
It looked like the model was correct and the geometry will work OK. So next we added some curves to make it look swoopier. We modeled the part in OpenSCAD:
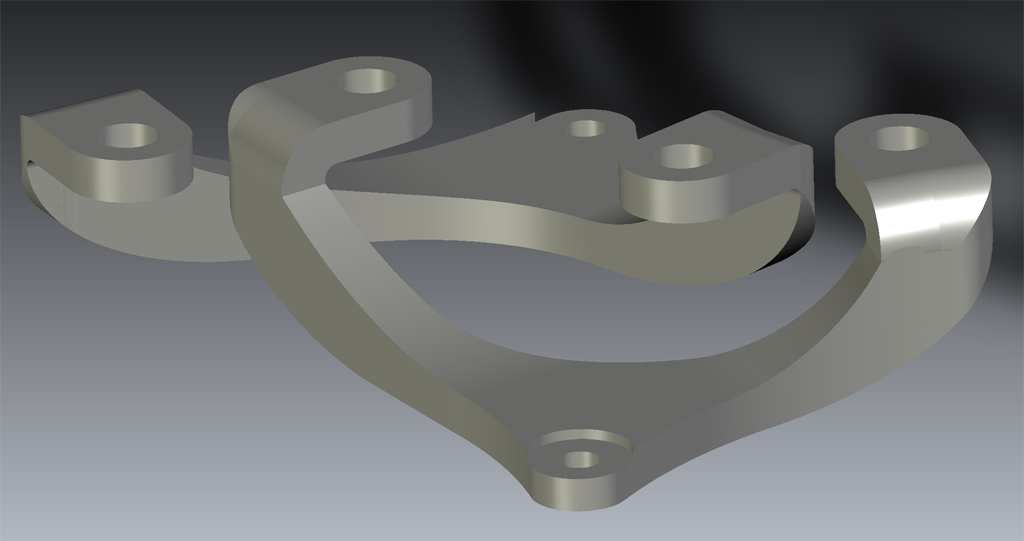
Then exported the part as STL:
And made new 3d prints of it:
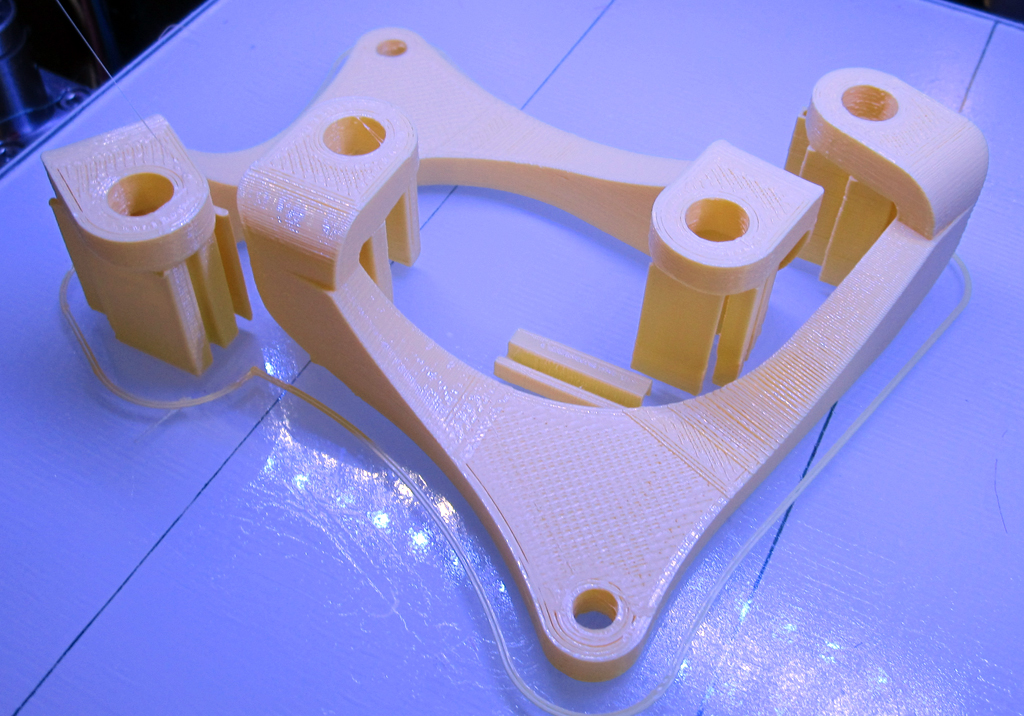
And test-fit them:
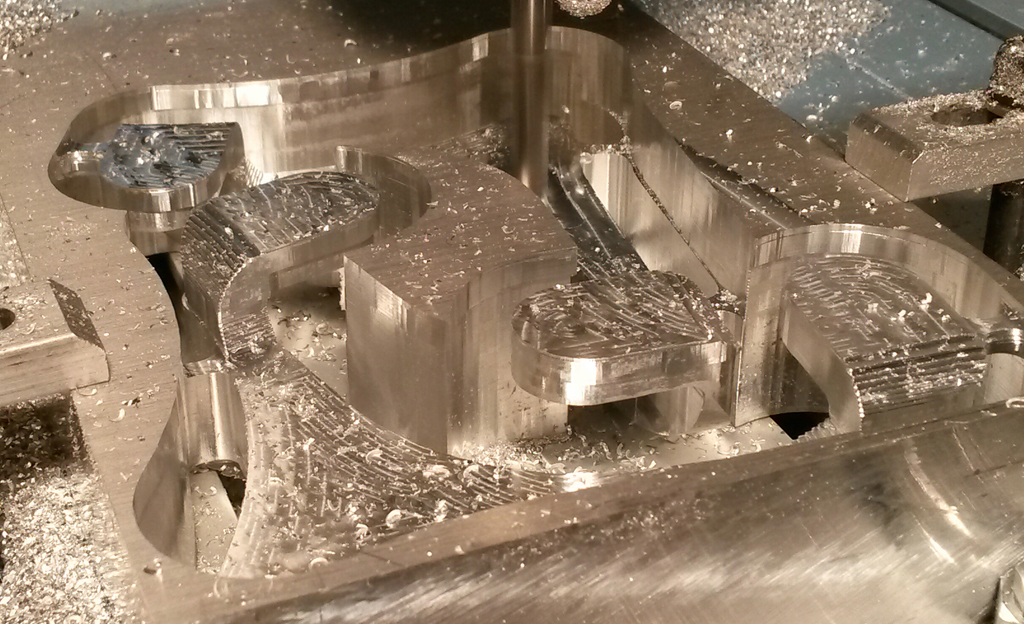
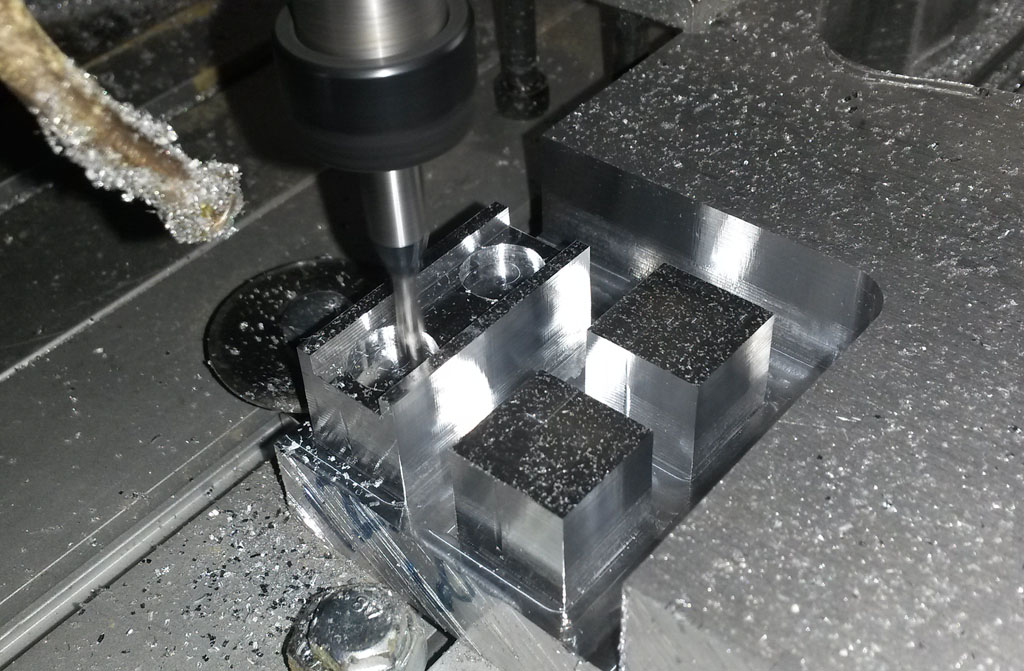
Now the hard part begins. We had a cheap hobbyist CNC/Mill (search "3020 CNC" or "6040 CNC" on e-bay) that had been (and continues to be) both enticing and frustrating. Getting the tool paths correct is one of the biggest problems for us. So as a first try we cut the part in wood:
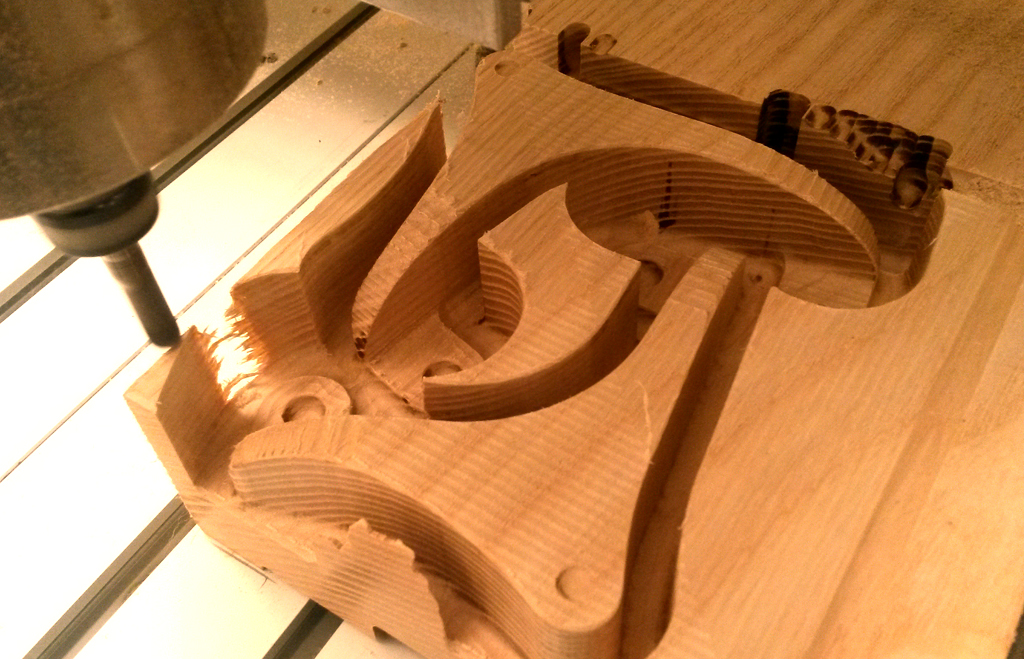
Towards the right, you can see that the program has a problem and it ran the bit hard into the wood. That would have broken the bit if it were metal 
To make the part, we planned to mill once from the top and then again from the bottom. So we got brave and bolted it into the mill for the bottom cut:
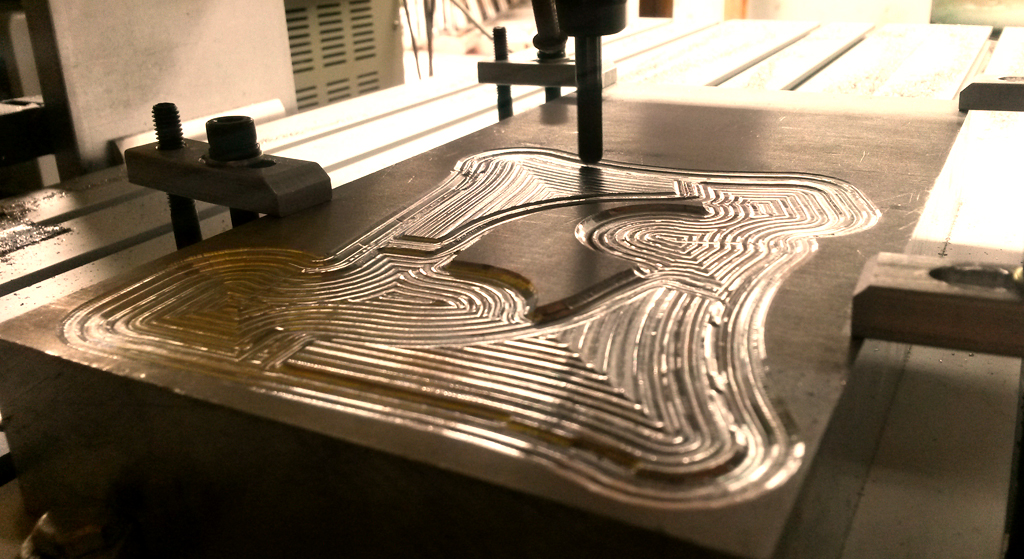
Soon thereafter, we found that there was a bad connector on the mill's spindle. So the bit would randomly stop, but the XYZ motion would continue, until the bit got snapped off on some material. Many re-starts and bits later, we finally got to where you could see the parts taking shape:
https://www.youtube.com/watch?v=nu96JBW8-Ds
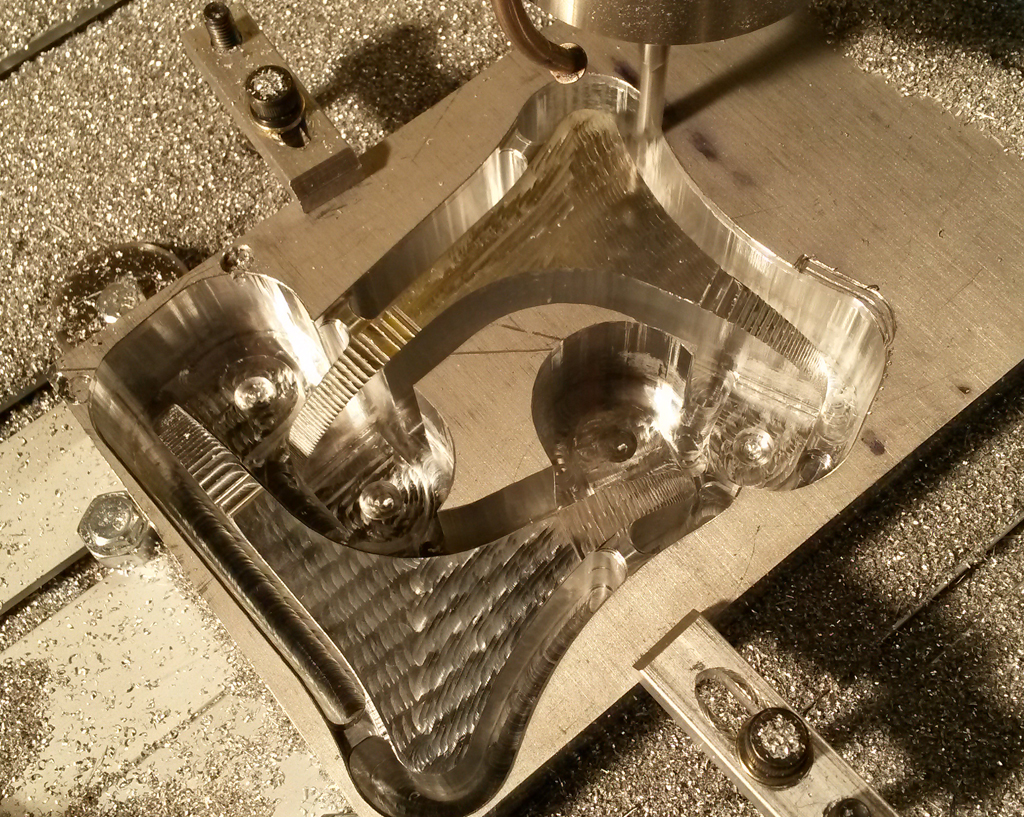
Then came the critical step of flipping the part over in the mill without screwing up the zero. Of course I screwed up the zero--but aluminum is hard to see through so I did not know till later:
https://www.youtube.com/watch?v=Po4NB8kPodw
After MANY hours manning the mill, and many more unattended hours the parts were finaly ready to be broken out of the base block:
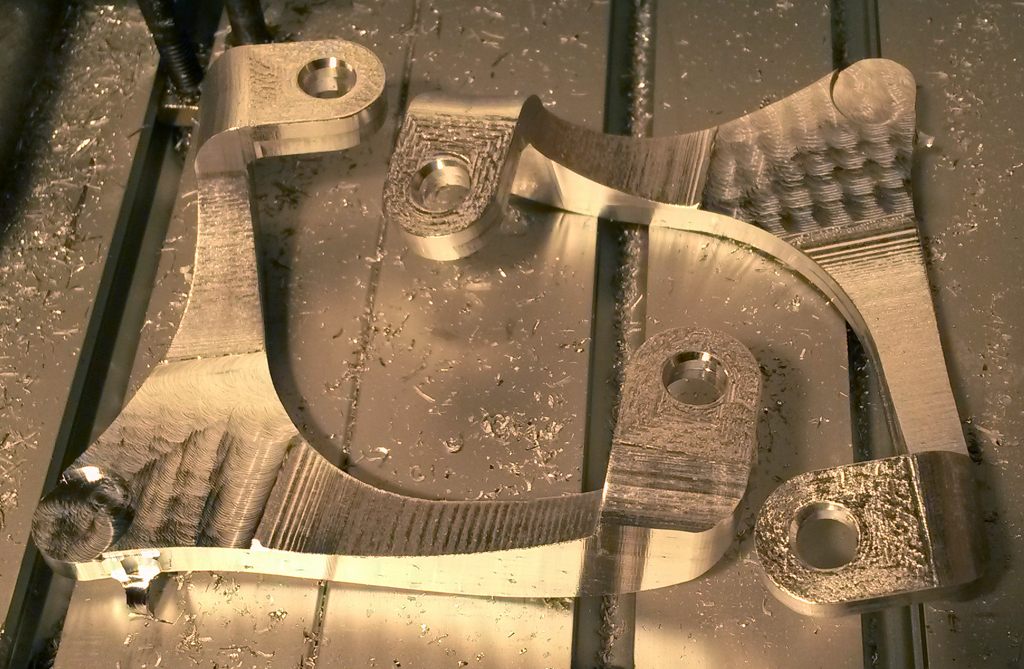
They are pretty rough, but aluminum files and sands well, so soon I had these:
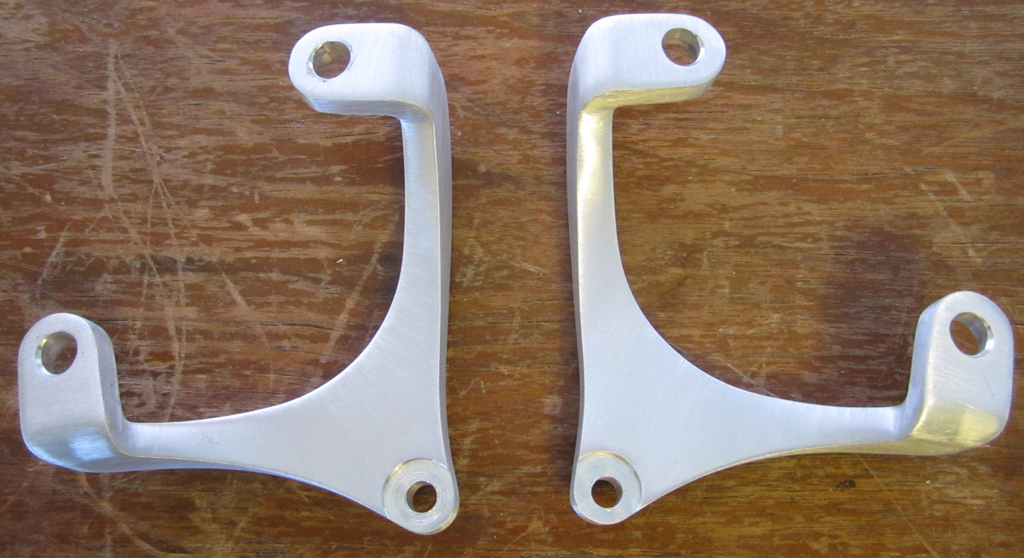
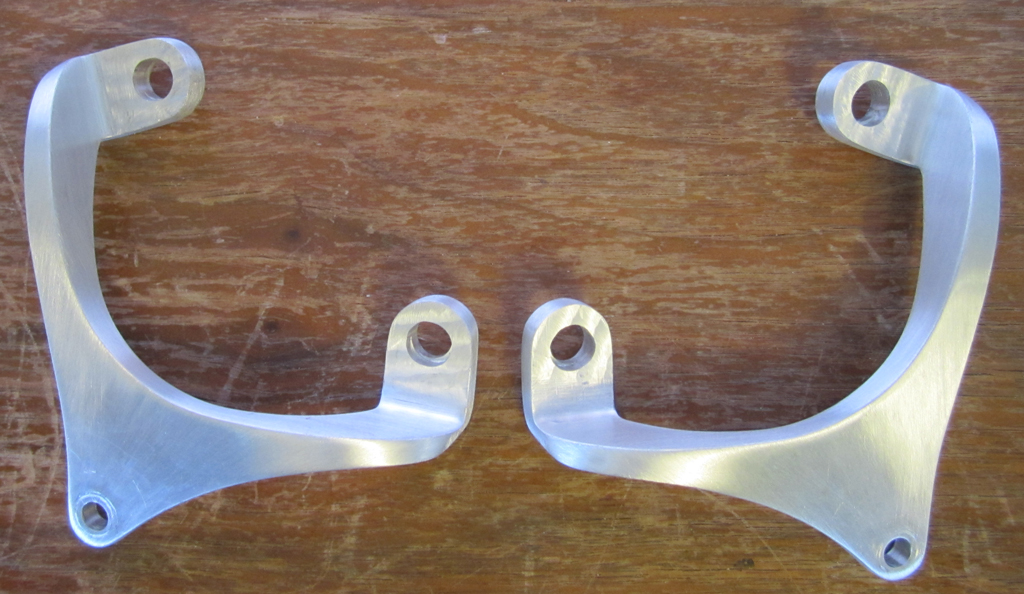
These brackets and the pulleys will be red-anodized to match the other accessories on the engine.
Here is one mocked up against a throttle body:
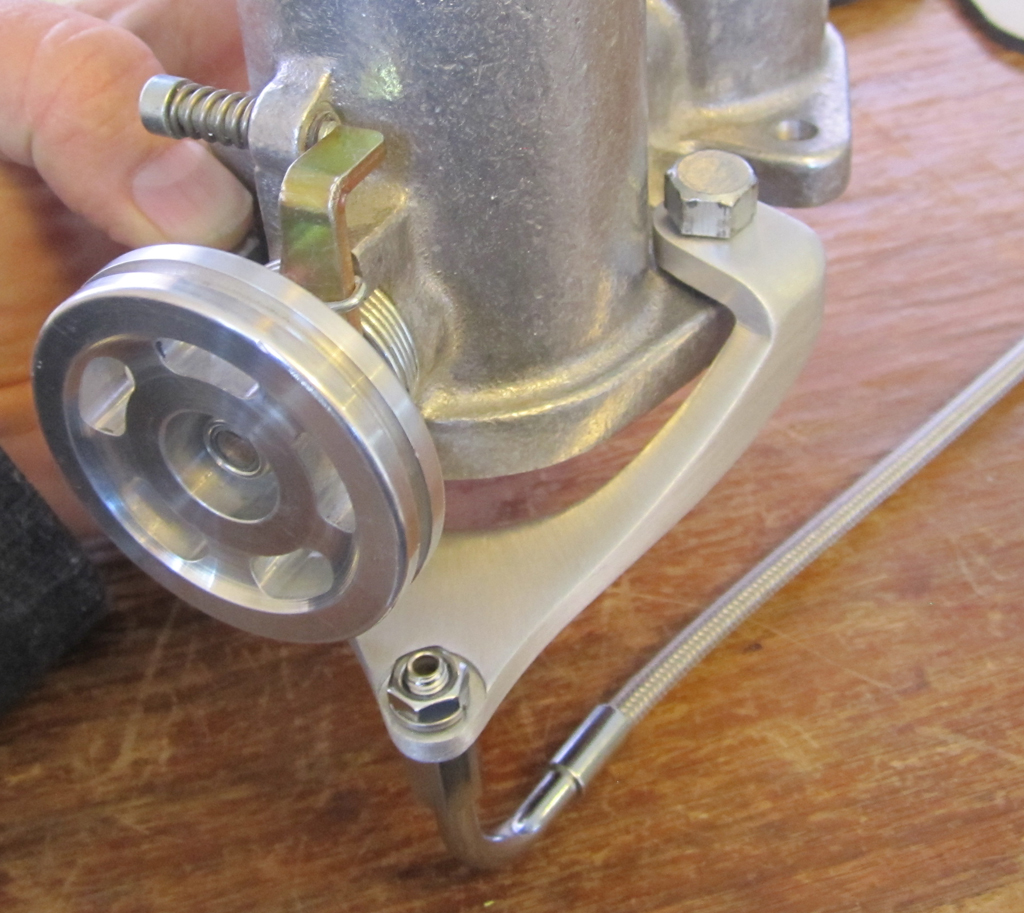
This picture shows how the cable opening aligns with the pulley slot. It is actually perfect, but my camera was at a bit of an angle:
List of things I need to figure out:
1) learn more about the tool paths
2) find a good round over bit for aluminum in air
3) figure out a better way to zero the mill between sides
In all it worked out pretty well considering we did not have to send the parts out.
There is probably well over 100 hours of my time in the design and milling. Not to mention the mill itself, the upgrades, the PC to run it, the toolpath software, a handful of bits, and $15 of aluminum. Frankly I could have carved them out of a block of aluminum faster!
Last edited by Baxsie on Fri Aug 08, 2014 11:38 am; edited 1 time in total |
|
| Back to top |
|
 |
Baxsie
Joined: 12 Apr 2012
Posts: 253
|
| Posted: Sun Jun 01, 2014 6:53 am Post subject: Remote Oil Filter Mount the hard way |
|
|
We had not given a huge amount of thought to where the remote oil filter would go. A popular place to put it is in the wheel well, I never liked that since I was worried that gravel might puncture it, plus it us so dirty there.
We wanted to come up with a place where changing it would not be a mess, so ideally any spills from changing should go straight down to the catch bucket.
We decided to put it just behind the number 4 cylinder. There is really not much going on there except the tin.
First up was figuring out the mechanical mounting. We found a Billet Remote Filter Mount from CVR that had the inlet and outlet where they would work well. The closest thing in that area you can mount to is the #4 exhaust port. We thought about a "claw" but they did not put it in exactly the right position. Plus the flanges on the exhaust are so thick, combined with the big tubing and sharp bend, that it would be difficult to get the nut and a claw on the lower stud.
We used 3/16 stainless to make a bracket, and welded it directly to the header's flange:
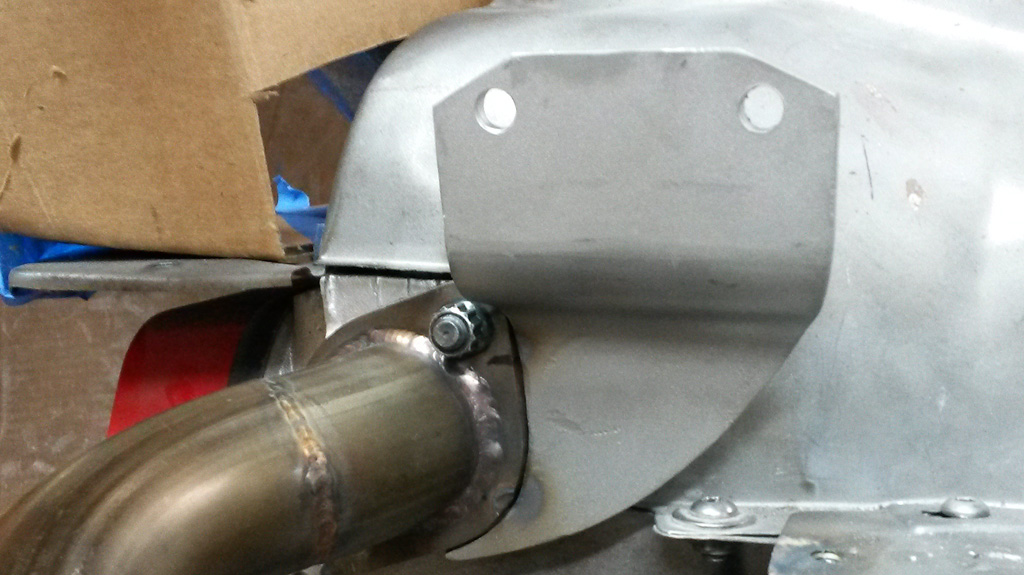
TIG welded the bracket to the flange, then bead blasted. Later we flat-sanded it to ensure a good seal:
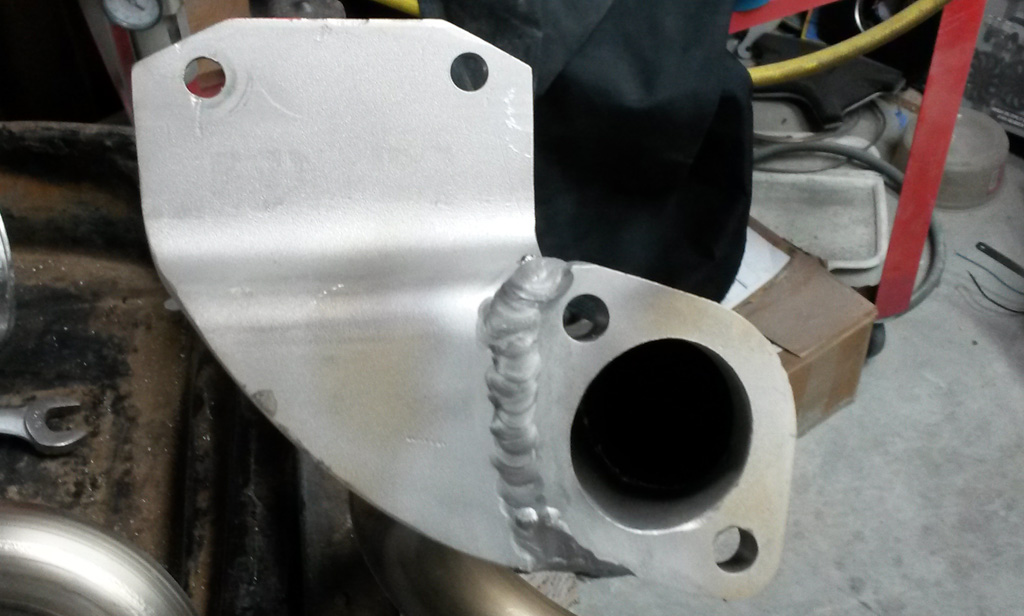
We modified the tin to allow the filter to pass through:
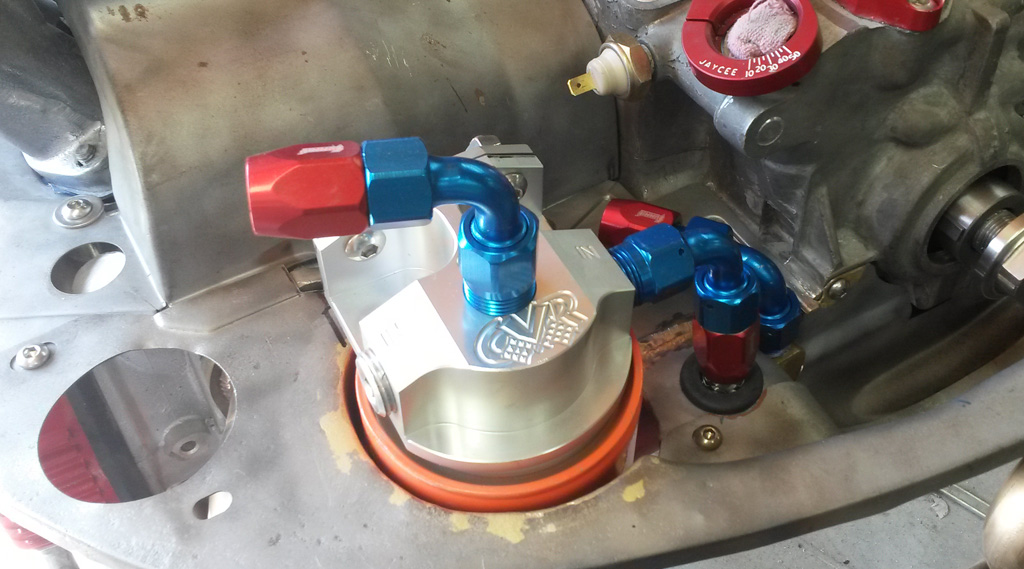
The #4 exhaust practically wraps around the filter, so we made a heat shield to block heat from the exhaust header. It should also help keep any oil change mess off the header. We plan to wrap at least this section of the header to help reduce heat. You can see that the bottom of the oil filter is only just barely in the #3 + #4 exit airflow:
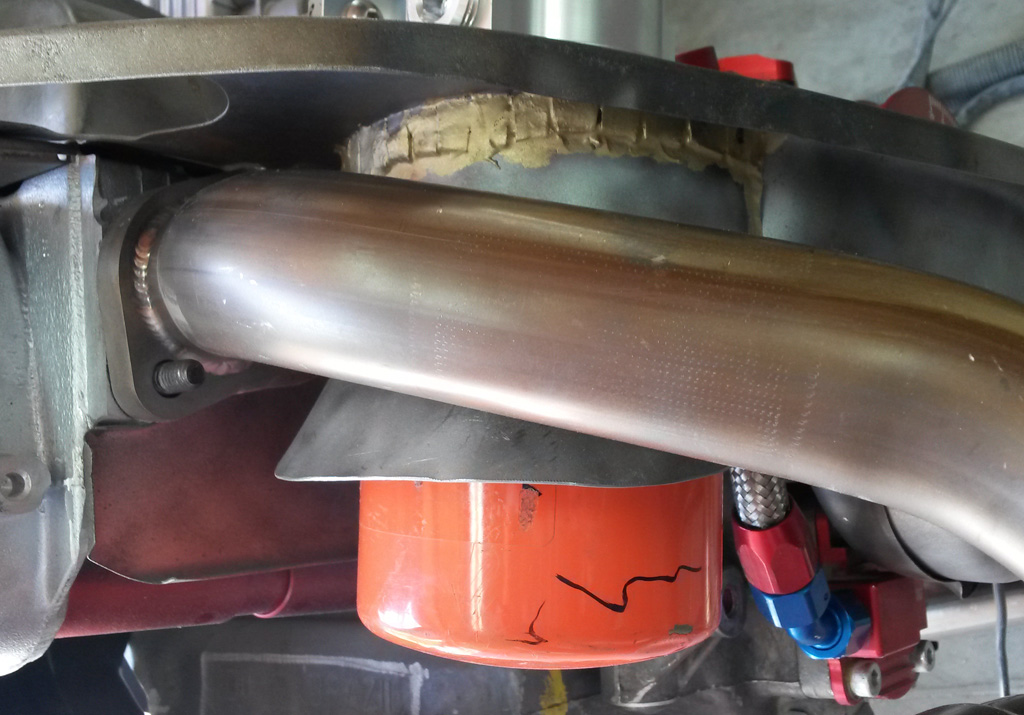
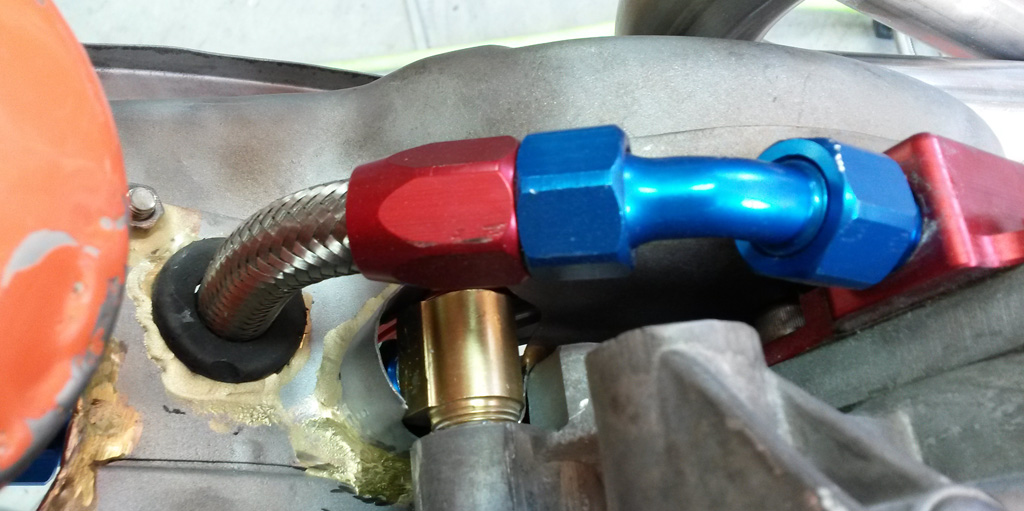
Running the lines was a little tight, but it does work. We used the SummitRacing brand AN style fittings and hose (crosses fingers):
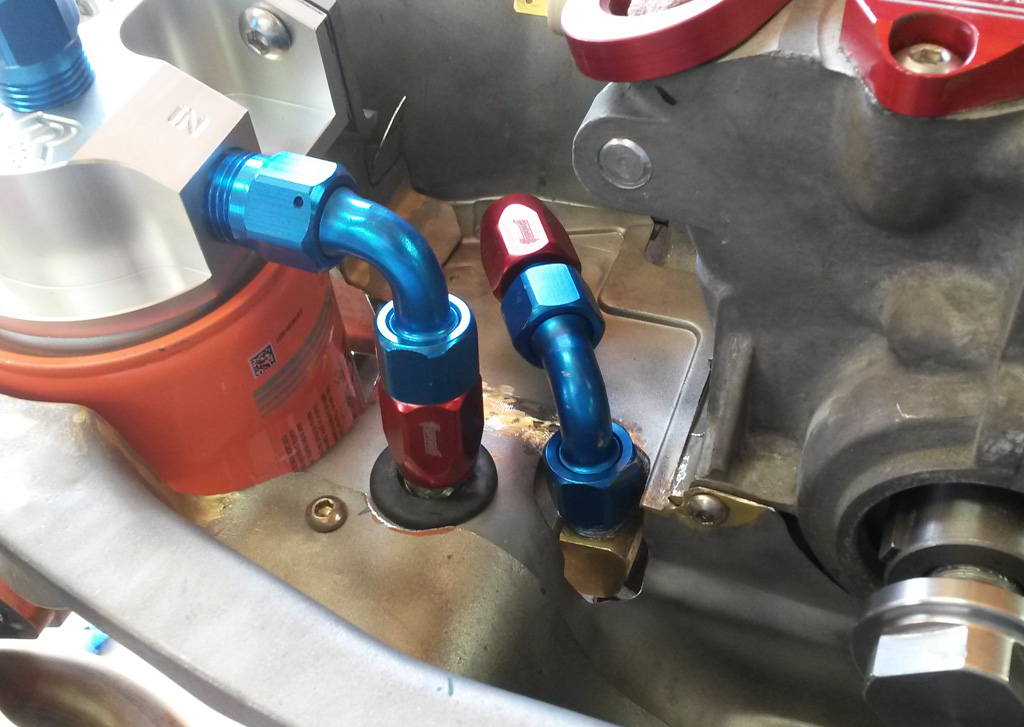
Here is how the plumbing looks from underneath:
Last edited by Baxsie on Fri Aug 08, 2014 11:37 am; edited 1 time in total |
|
| Back to top |
|
|
project_dog
Joined: 21 Apr 2014
Posts: 33
|
| Posted: Sun Jun 01, 2014 11:46 am Post subject: |
|
|
| looks good. Just worried about the header pipe heating it up the oil filter. What are you running for a oil cooler? |
|
| Back to top |
|
|
Baxsie
Joined: 12 Apr 2012
Posts: 253
|
| Posted: Sun Jun 01, 2014 2:04 pm Post subject: |
|
|
| project_dog wrote: | | looks good. Just worried about the header pipe heating it up the oil filter. What are you running for a oil cooler? |
We are using the CB Atomic Cool, tucked up by the transmission:
http://www.rcvwclub.org/phpBB2/viewtopic.php?p=9364#9364
The shield should block some heat, and we will use that fiberglas exhaust wrap stuff on at least that header. |
|
| Back to top |
|
|
Baxsie
Joined: 12 Apr 2012
Posts: 253
|
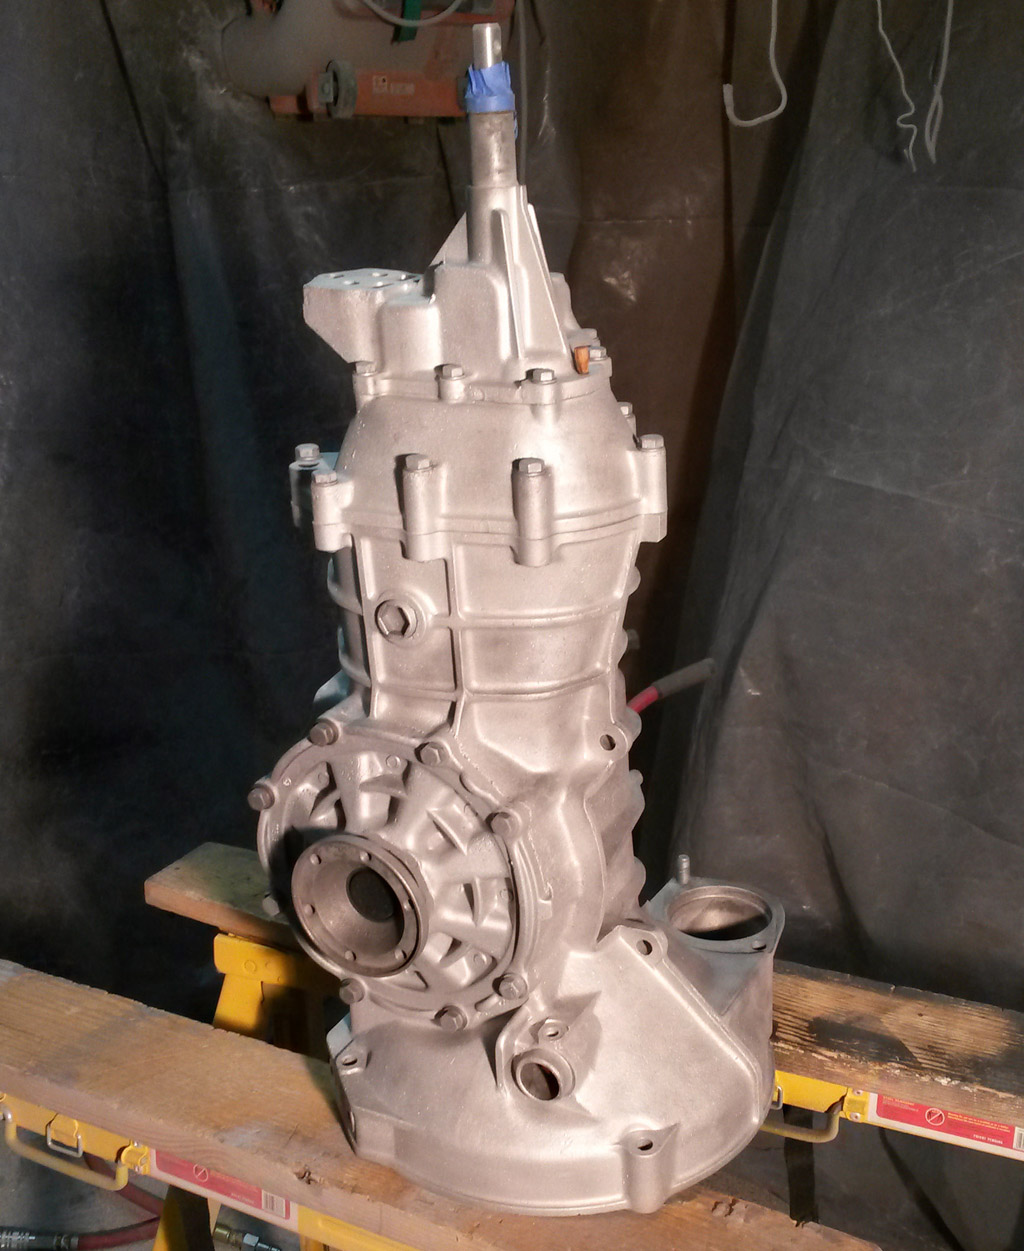
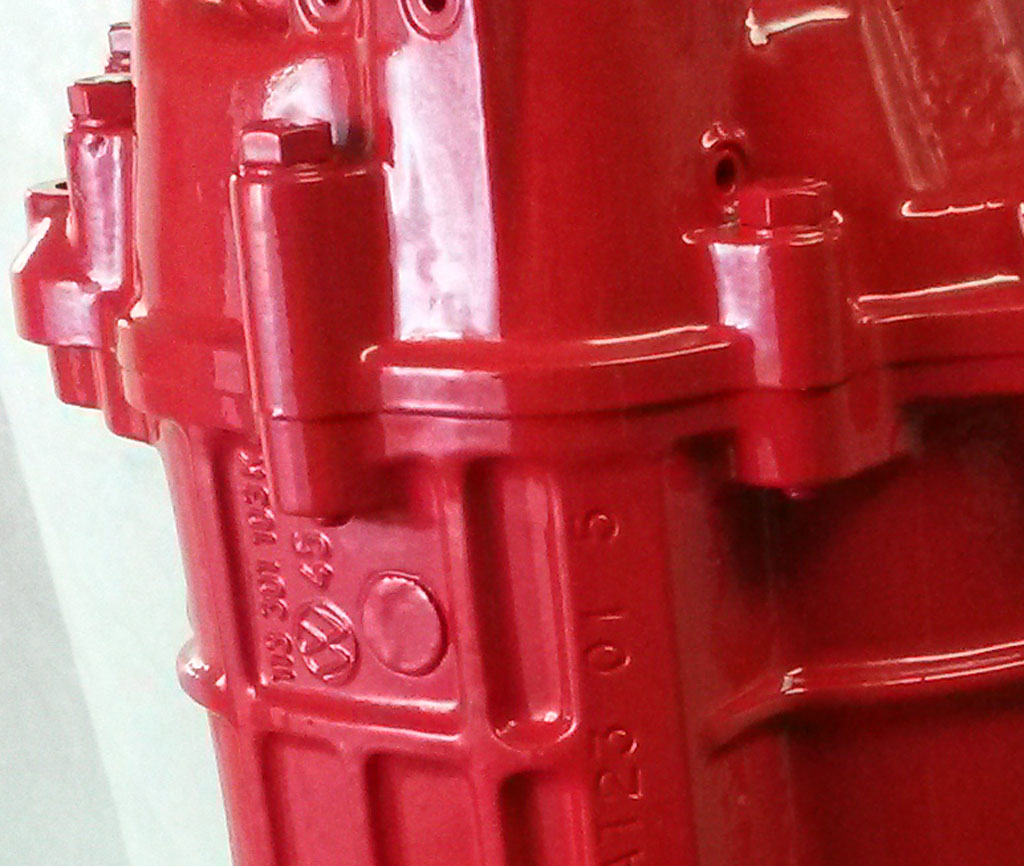
| Posted: Sat Jun 07, 2014 9:33 pm Post subject: Painting the Transaxle RustSeal Motor Coater |
|
|
We decided to give the Transaxle a shot of RustSeal's "Fire Red" Motot Coater Paint.
Bead blasting starting:
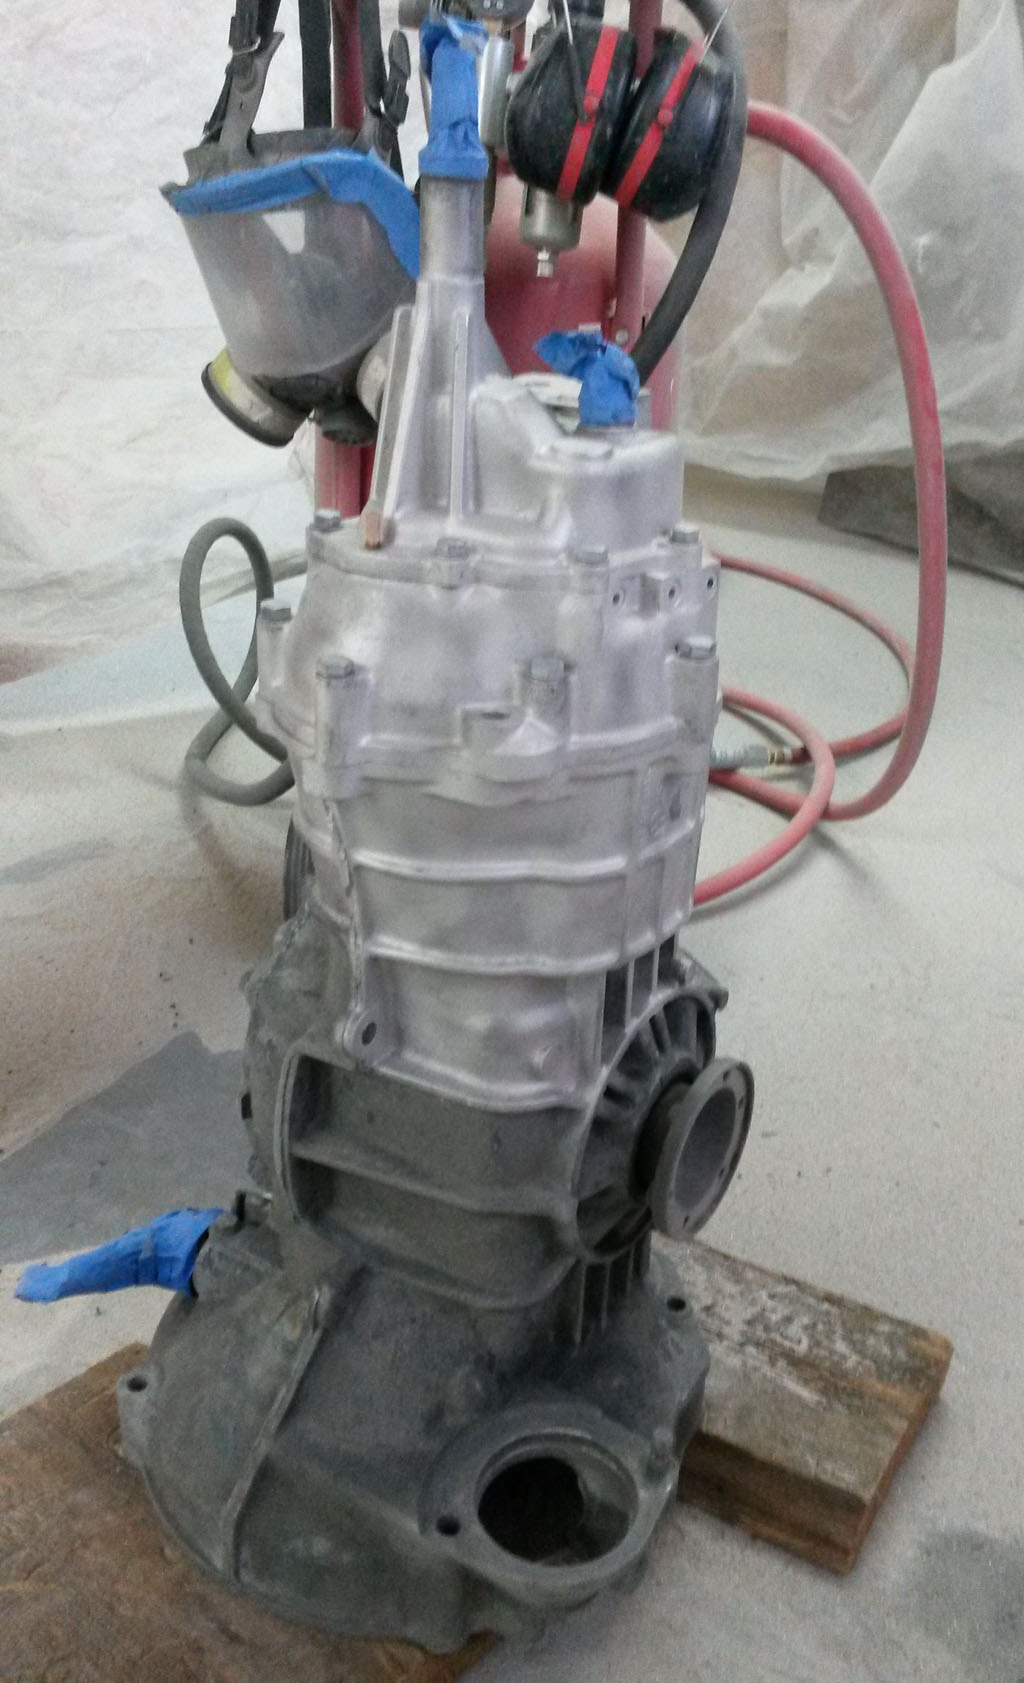
Looks pretty sharp all blasted. Next we used the AquaClean and AquaBlast - - that made it grey again instantly!
A shot of the painted transaxle:
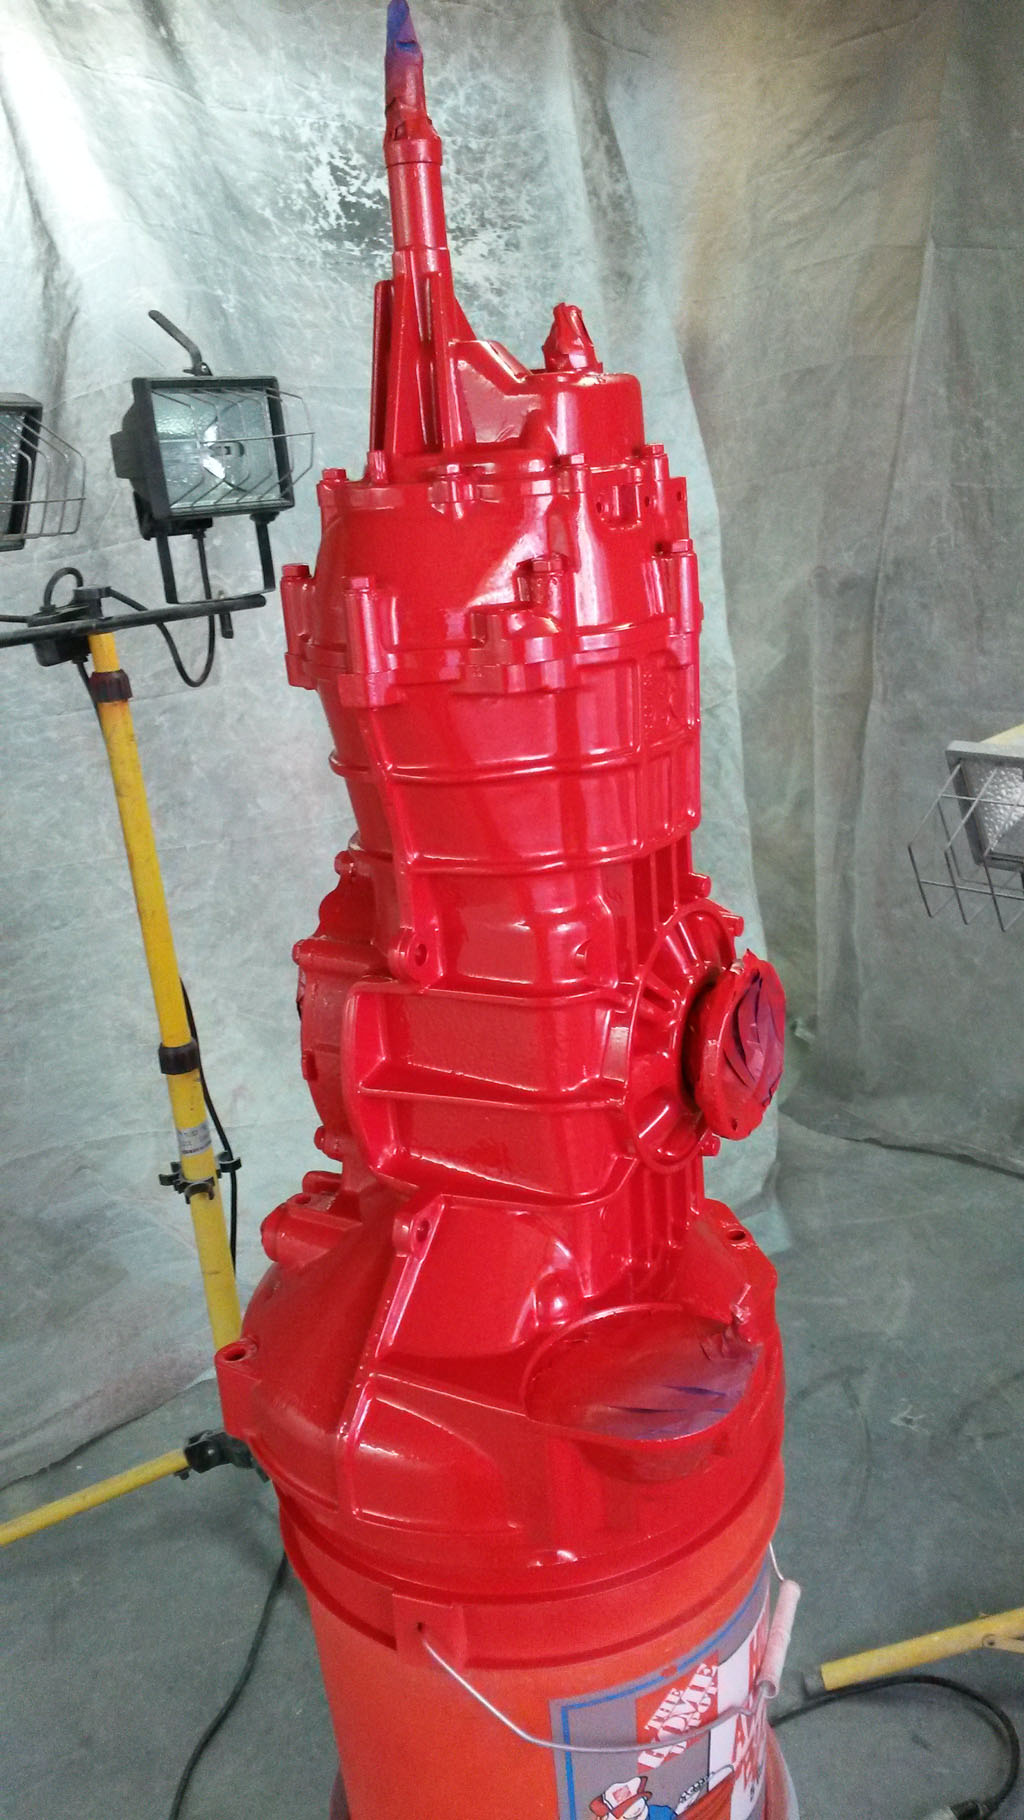
The paint does and amazing job of smoothing:
Now to let it cure, which we have found takes weeks
http://baxsie.com/images/forum/bug/white_75/Paint_Transaxle/Bead_Blasting_Starting.jpg
Last edited by Baxsie on Fri Aug 08, 2014 11:37 am; edited 1 time in total |
|
| Back to top |
|
|
project_dog
Joined: 21 Apr 2014
Posts: 33
|
| Posted: Sat Jun 07, 2014 11:58 pm Post subject: |
|
|
| what kind of paint did you use? it looks great |
|
| Back to top |
|
|
Baxsie
Joined: 12 Apr 2012
Posts: 253
|
| Posted: Sun Jun 08, 2014 6:33 am Post subject: |
|
|
| project_dog wrote: | | what kind of paint did you use? it looks great |
We used KBS MotorCoater, in Fire Red:
http://www.kbs-coatings.com/motor-coater-kit.html
The KBS (competitor to POR-15) paints are a little weird. They are one-part, and cure from moisture in the air. The part you are painting needs to be clean, so they outline cleaning first with an aggressive detergent (AquaClean) then you follow that with an etch step (mild acid, I guess) called AquaBlast.
The only down side I have seen (we used it on our brake rotors and valve covers) is that it seems to take a LONG (weeks+) time to fully cure to its ultimate hardness. It is tack free in a few hours, but if you press hard with your thumb even after 24 hours you can leave a print.
| Quote: | | Average cure times are 2-4 hours, however depending on humidity & temperature levels, dry times may vary. |
Another product they sell mentions cure time in their forums:
| Quote: | | DiamondFinish Clear will take 4 days to become hard under normal conditions and will continue to harden over the following weeks. |
This is what we have seen with the Motor Coater . . . ultimate hardness takes a long time.
Luckily we have time to wait. |
|
| Back to top |
|
|
Baxsie
Joined: 12 Apr 2012
Posts: 253
|
| Posted: Tue Jun 10, 2014 8:24 pm Post subject: Custom CNC AC Bracket Back From Machine Shop |
|
|
We got the bracket for the Sanden AC Compressor back from the machine shop today -- Thanks Parker!
The bracket mounted:
With the alternator, and tensioner, left side:
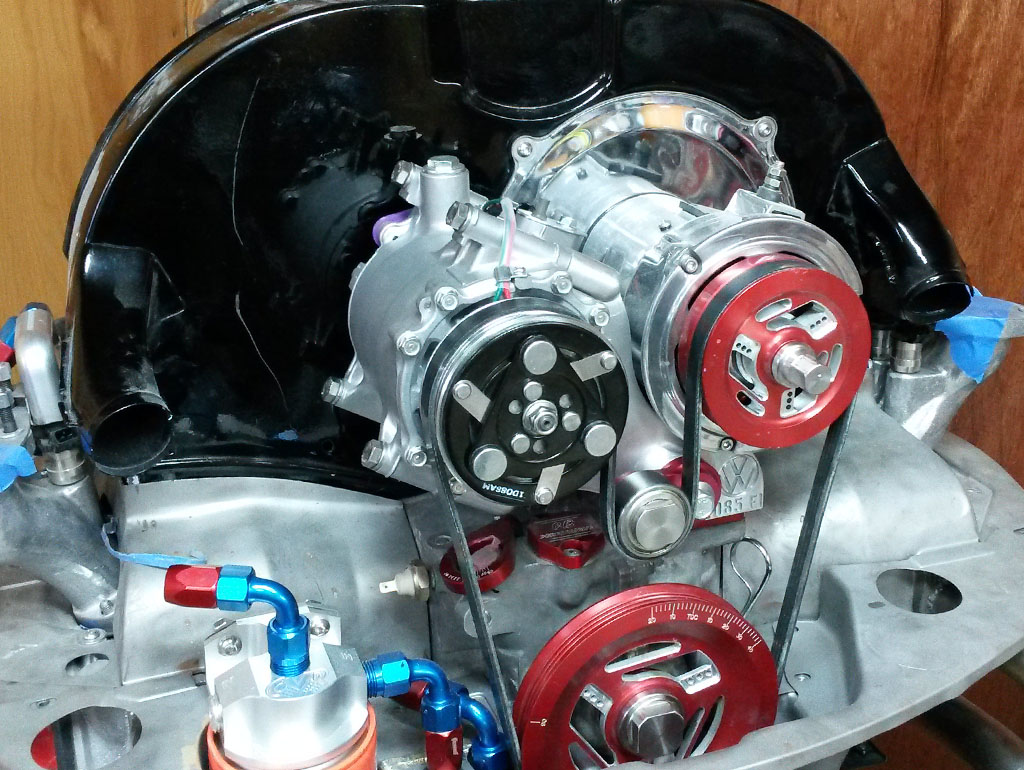
right side:
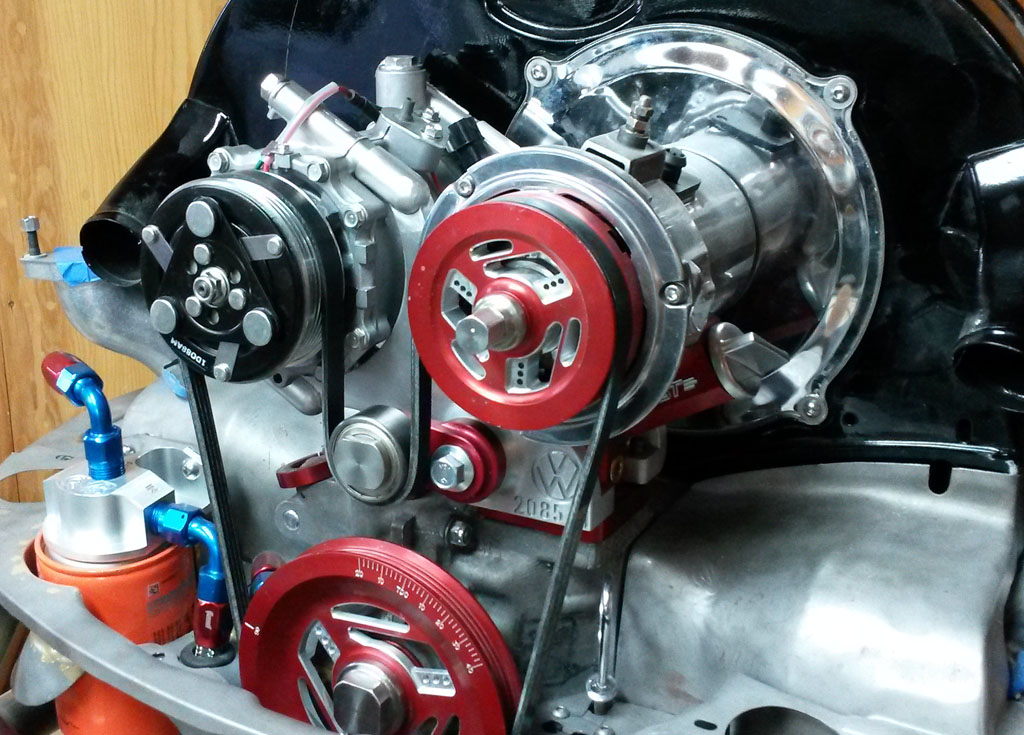
straight:
detail shot of the logo and displacement badge:
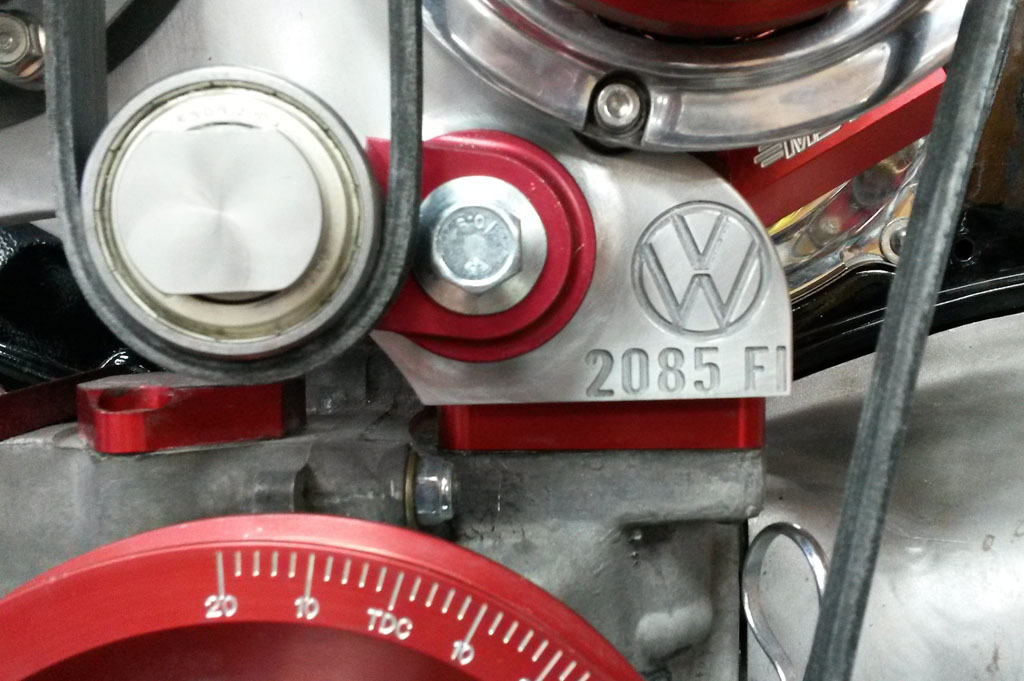
This bracket and a bucket of other bare aluminum parts will all get red anodized.
Last edited by Baxsie on Fri Aug 08, 2014 11:34 am; edited 1 time in total |
|
| Back to top |
|
|
project_dog
Joined: 21 Apr 2014
Posts: 33
|
| Posted: Tue Jun 10, 2014 11:18 pm Post subject: |
|
|
| great work man. What machine shop did this? |
|
| Back to top |
|
|
inzel
Joined: 02 May 2014
Posts: 11
Location: Spokane, WA
|
| Posted: Wed Jun 11, 2014 6:46 am Post subject: |
|
|
This is coming along great! I look forward to seeing it progress further. Keep up the good work.
_________________
--inzel-- |
|
| Back to top |
|
|
Doodoob
Joined: 06 Jul 2011
Posts: 98
Location: Spokane, WA
|
| Posted: Wed Jun 11, 2014 7:33 pm Post subject: |
|
|
| Looks great! |
|
| Back to top |
|
|
Baxsie
Joined: 12 Apr 2012
Posts: 253
|
| Posted: Sat Jun 14, 2014 9:40 pm Post subject: Engine Test Fit, throttle splitter concept |
|
|
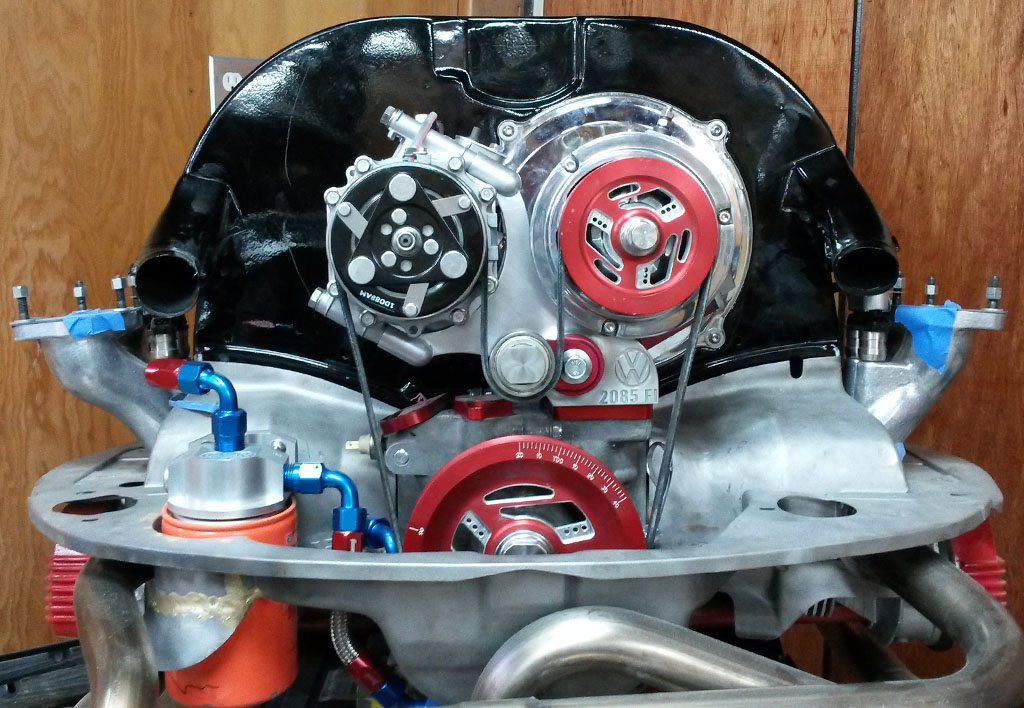
Took some time today to see how the engine would fit with the throttle cables and oil plumbing:
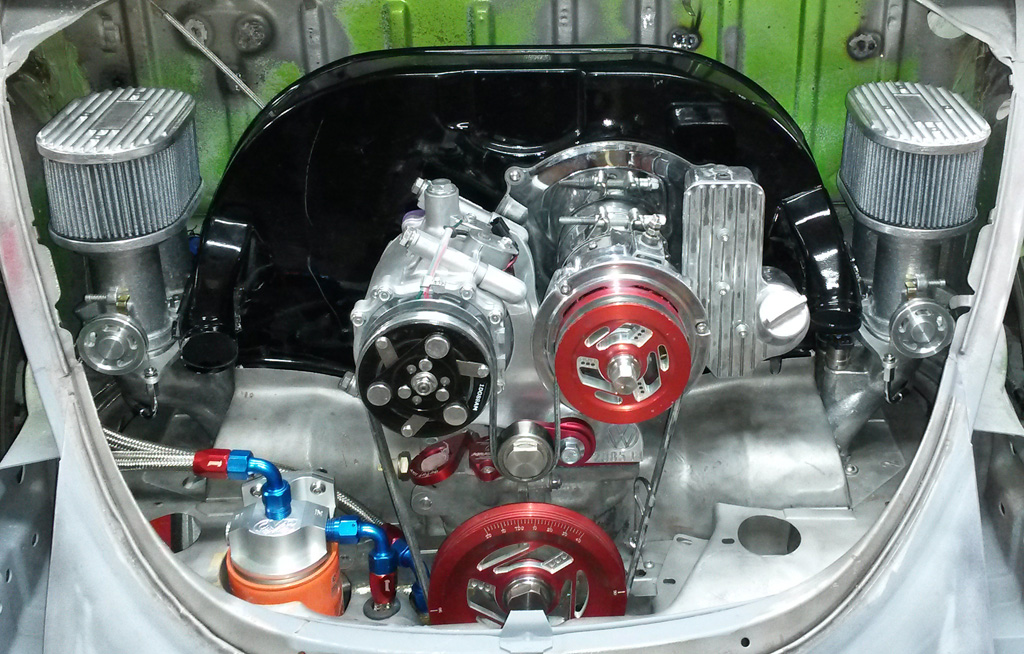
Found out that the right throttle bracket is in the way of the injector hold-down, so that will have to be fixed
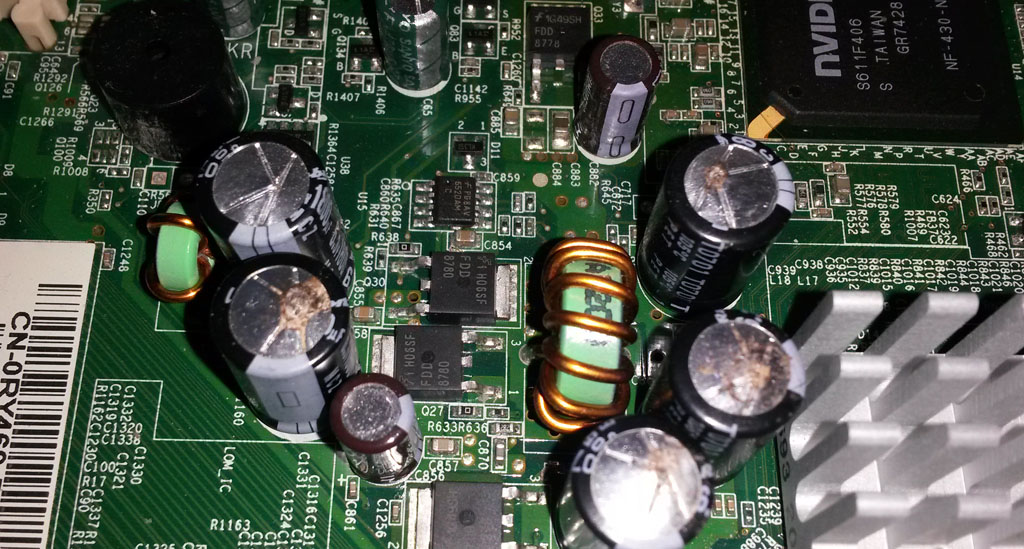
We were going to mill a throttle cable splitter:
But the old PC that drives the mill would not boot. A bunch of swollen caps on the motherboard . . .so I'll have to dig around for another old PC:
Also need to move the oil cooler a smidgen, the fitting just touched the transmission.
Last edited by Baxsie on Fri Aug 08, 2014 5:17 am; edited 1 time in total |
|
| Back to top |
|
|
Baxsie
Joined: 12 Apr 2012
Posts: 253
|
| Posted: Mon Jun 16, 2014 8:10 am Post subject: |
|
|
I found two more identical machines in the "retired" pile. One also had bad caps, but the second one's caps are perfect. Moved the HDD over from this machine and we are cutting again:
Last edited by Baxsie on Fri Aug 08, 2014 5:18 am; edited 1 time in total |
|
| Back to top |
|
|
Baxsie
Joined: 12 Apr 2012
Posts: 253
|
| Posted: Sun Jul 06, 2014 12:46 pm Post subject: Priming the pan with 2K epoxy primer |
|
|
At long last, we think we have done all the modifications to the pan (of course there will be more, we just don't know it yet ), so now it is time to shoot it. Today my son shot the 2k epoxy primer:
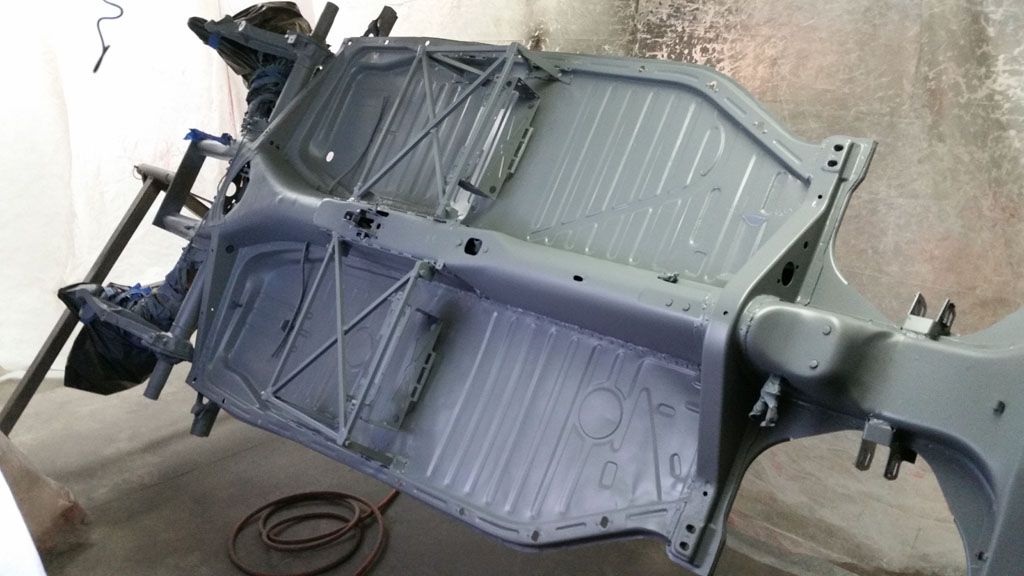
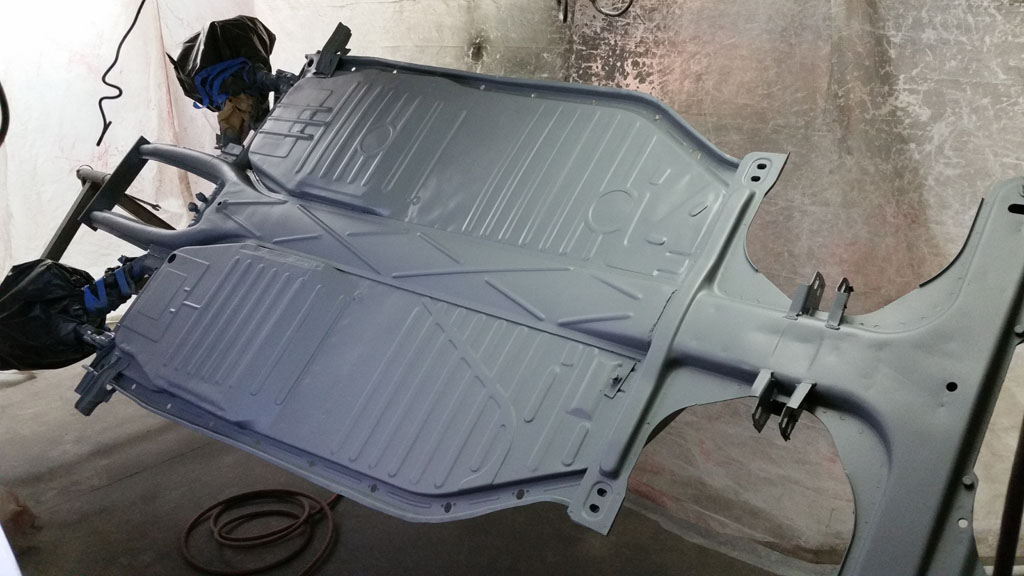
Next will be to seam seal, then shoot it with the black. |
|
| Back to top |
|
|
Baxsie
Joined: 12 Apr 2012
Posts: 253
|
| Posted: Fri Aug 08, 2014 5:19 am Post subject: Sealing and Painting the pan |
|
|
Sorry for having the broken images for the last while. I had a bit of trouble with the hosting company. Now the images are hosted on a server I own, tucked into a state-of-the art colo that I can visit. No more "digital sharecropping". Deep breaths . . .
Back to the bug!
We seam-sealed the pan:
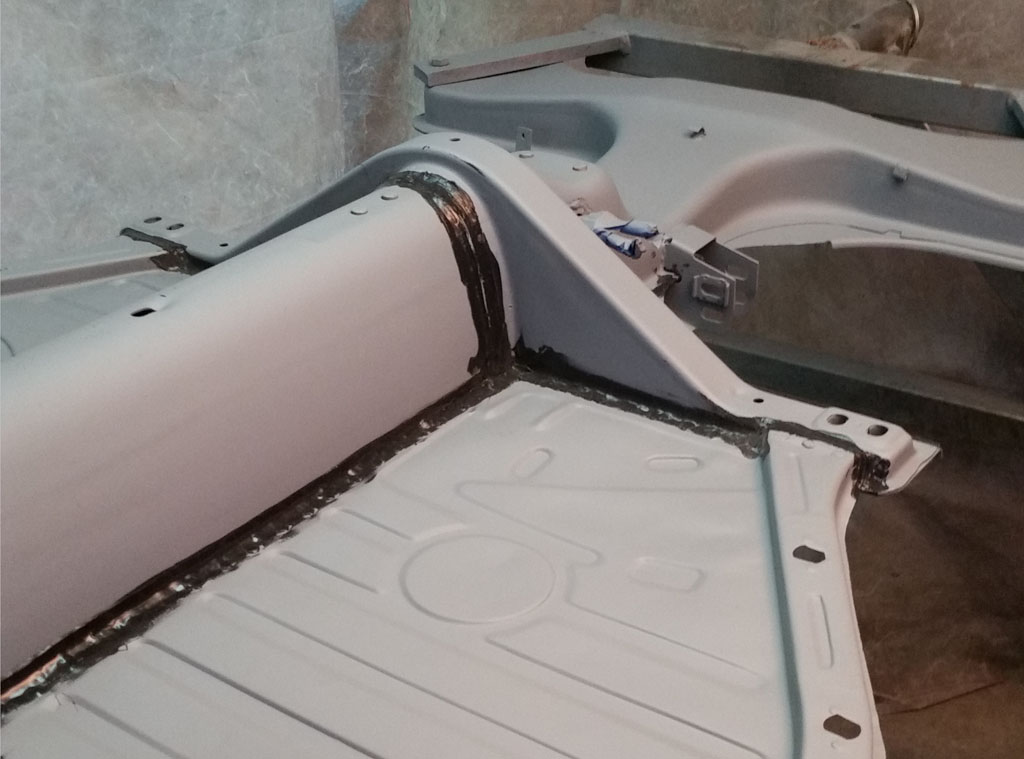
And shot it with the black paint:
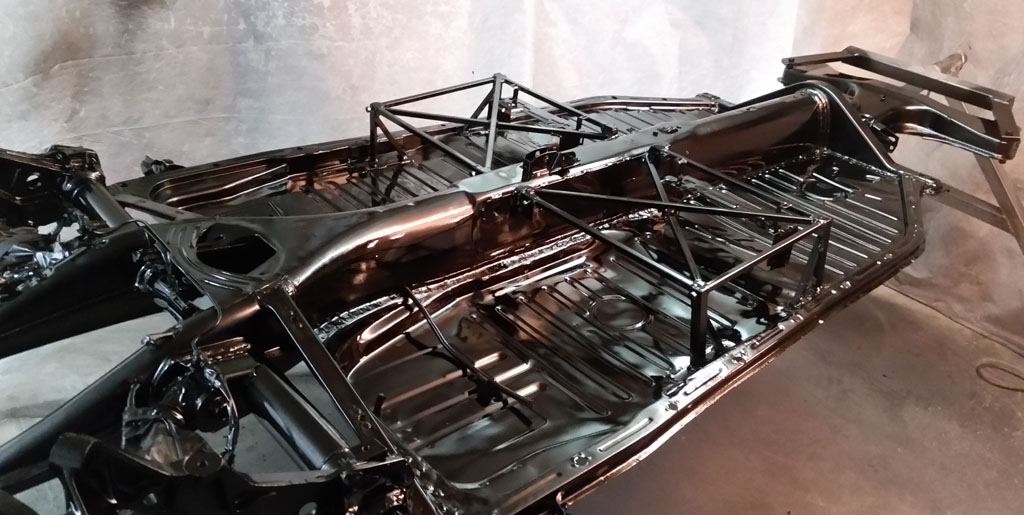
Now that the image hosting is fixed, hopefully I can get back to more regular updates. |
|
| Back to top |
|
|
|


